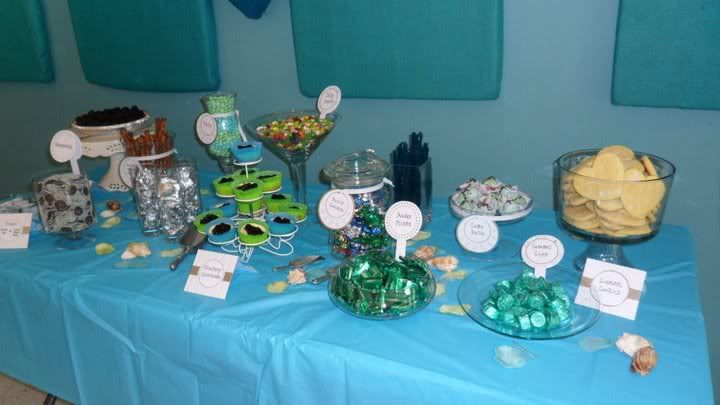
Being that I was a bridesmaid in one of my best friends' wedding not all that long ago, it also necessarily involved throwing a great bridal shower. Along with all the decorations, games, and regular food, we created a candy table that ended up looking really great, if I do say so myself. :)
If you've never done it before, it can seem like somewhat of a daunting task with all of the different elements, but I think I've now got a good handle on the best way to get all of them to come together and look really great. I decided that it might help someone else out there to have some tips on making this aspect of a bridal shower, wedding, or really any event come together as smoothly as possible, even when you are on a budget like me.
 |
| Candy Buffet! |
1) Ok, so you've decided to do a candy bar for your event. Wonderful idea. Your first task is to keep your eye out all the time for whimsical glass jars, bowls, and containers to use. If you go to some of the more expensive places, you can end up spending your life savings on glass containers... so don't. Enlist the other event helpers to check out their local thrift stores for unusual-shaped glass items. You'll want ones of different heights and shapes, so keep that in mind. The display will look the best if you can keep all the containers with the same clear glass theme. The places I had the most luck finding these items at reasonable prices were:
- Thrift Stores (Salvation Army, Goodwill, etc.)
- Craigslist (make this website your best friend! it really pays off -- make your own "looking to buy" ad, as well as checking ones from sellers.)
- Your mom/aunt/friend/other person who already has these items for you to borrow
- World Market
- HomeGoods Store -- I had never been into one of these stores before this project, and it's got a lot of cool stuff! The glass containers are some of the most reasonably priced with the largest variety you'll find at any regular kind of store.
2) Choose a color scheme. The presentation will be much more eye-catching if you stick with 2-3 color options. Our colors were blue and green, obviously, but it can be a bit of a challenge to find candies that are in that range -- you'll just have to think outside the box for that one and come up with unique ideas to stay as close to homogeneous as possible with the colors.
3) Find scoops to scoop up the candy! This was the hardest thing for me to find. Everywhere I looked online seemed to have very expensive options. In the end, I found very nice metal scoops at World Market, along with a few others from a local dollar store and thrift store. You may also need tongs or a cake server -- so check with friends and family, or go to World Market for those too.
4) Create or find labels to label each candy type. Our maid-of-honor found a really cute set of labels made especially for a candy table from a local party supply store, with three different display formats: cards folded into a "v" to place directly on the table surface, labels attached to popsicle sticks to place directly into the candy, and ones with ribbon to tie around the outside of the container. Obviously each display format will not work for every type of candy, so it was easier for us to go through the options the night before and pick which containers would have which labels and candy type, so that we didn't have to worry too much about figuring that out the day of the party.
5) Find the candy and other items for the candy bar! Depending on where you live, it can be a bit of a challenge to find bulk candy to put in the containers. Living in Virginia, we had the most luck at
Wegman's and
Martin's. It got a little annoying at times to pick out the candies with the blue or green wrappers from the bulk bins, but it looks a lot nicer in the end, so it's worth spending your time doing that. I spent a lot of time figuring out if it was more expensive for me to purchase the candy in-store or online, and by far it was cheaper in-store. Even with certain websites offering discounts and/or free shipping, it still wasn't worth it.
Here are some helpful ideas for items that you can make for a candy bar, and the ingredients/colors used can be interchanged depending on your color scheme:
- Double Blueberry Pie - I actually made this with blackberries for the party, but again with blueberries later. It's a really delicious pie and very refreshing with fresh berries on it. If one of your colors is red or pink, try raspberries or strawberries.
- Cookie Balls - Use food coloring to make the white chocolate coating the appropriate color for your scheme. I used regular double stuf oreos instead of the mint, but either would taste great.
- Chocolate-Covered Pretzels, Sugar Cookies - Do the same thing with the food coloring as for the cookie balls.
- Mochi - This is a delicious Japanese dessert that is really easy to make. Use the basic mochi recipe with food coloring to make it whatever color you want.
6) Set up the display, and enjoy eating your creation! Yum!